How to Hang Curtains the Right Way

Getting the perfect set of curtains can completely transform a room, but there’s more to it than just grabbing the first pair you like and slapping them up. Trust me, I’ve made all the mistakes—poor measurements, rushing through the process, or even just picking the wrong length—and learned that there’s an art to hanging curtains that makes a world of difference in how your space looks and feels. So, if you’re ready to avoid the pitfalls and learn how to hang your curtains the right way, let’s go through what really matters, from styling to sizes, and the hardware you need to make it all work.
Ceiling Mount vs. Wall Mount
When choosing between ceiling and wall mounts for your curtains, think about the architectural style of your room, how high your ceilings are, and the overall look you’re aiming for. Ceiling-mounted curtains are particularly popular in modern, minimal spaces where the goal is to create a seamless, floor-to-ceiling effect. What makes ceiling-mounted curtains so effective is the way they trick the eye into seeing the space as taller than it is. By eliminating the break between the wall and the ceiling, the curtains appear as an uninterrupted line of fabric that elongates the height of the room.
This option works particularly well in spaces with lower ceilings that could benefit from an added sense of height or for rooms with floor-to-ceiling windows, where the curtains should run the full length to enhance the architectural features. Ceiling-mounted curtains also tend to be less distracting visually, allowing you to focus on the fabric itself without clunky rods and brackets breaking up the line.
On the other hand, wall-mounted curtain rods are typically seen in more traditional or classic spaces, but don’t let that fool you into thinking they’re dated. Wall mounts work beautifully when you want to highlight specific architectural elements like crown molding or detailed window frames. In these cases, placing the rod higher than the window frame can still add height to the room without requiring the clean, straight lines of ceiling mounts. With wall-mounted rods, the focus is more on the drapery hardware itself, so choosing elegant or even statement-making rods and finials can complement the room’s style.
Curtain Length
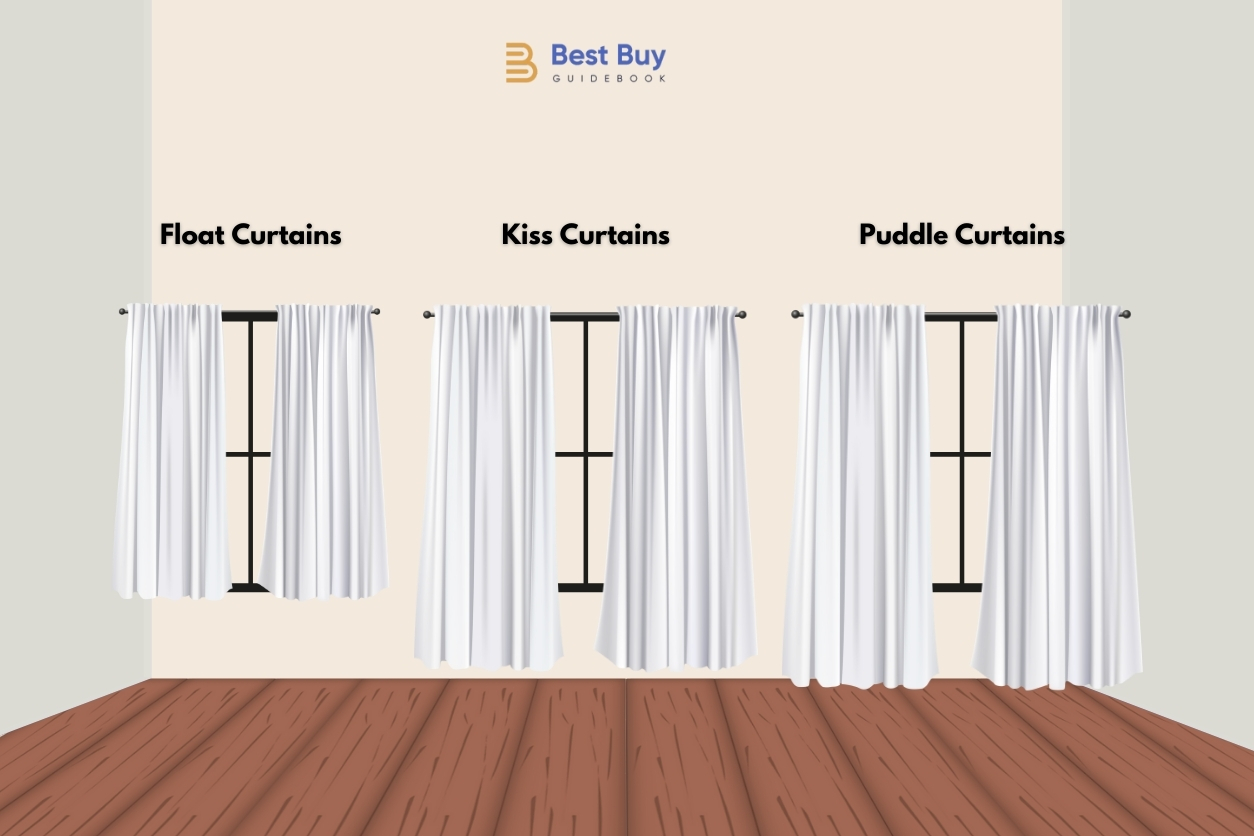
Choosing the right curtain length—or drop—is key to achieving the right balance in your space. There are three main types of curtain drops: float, kiss, and puddle. Each of these brings its own distinct style and function, so it’s important to know what works best for your space.
Float Curtains
This style keeps the bottom of the fabric just above the floor. It’s modern, minimalistic, and functional, especially for high-traffic areas. Curtains that float about half an inch above the ground are perfect if you want a clean look that also avoids dust and dirt gathering at the bottom. This option gives the room a sleek, tailored feel while keeping things practical. It’s especially useful in homes with pets or kids because, let’s face it, you don’t want your curtains dragging on the floor and collecting everything in sight.
Kiss Curtains
The term ‘kiss’ comes from the way the hem of the fabric just barely touches the ground—like a gentle brush. It’s a precise style that requires accurate measurements to pull off, but when done right, it creates a smooth transition between the wall and the floor, giving the room a sophisticated, almost custom-tailored feel. Kiss curtains are often seen in spaces where every detail matters. It’s that careful consideration that makes the room feel elevated without being too fussy.
Puddle Curtains
Now, if you’re looking for something that screams luxury and indulgence, puddle curtains are what you want. The fabric here pools or “puddles” on the floor, adding an opulent, almost theatrical quality to the room. This style is perfect for more formal spaces, such as living rooms or bedrooms, where elegance is a priority. However, with puddle curtains, you’ll want to use thicker, more substantial fabrics like velvet or heavy linen. Thin fabrics won’t puddle properly, and the effect can end up looking limp rather than lavish. One thing to keep in mind with puddle curtains, though, is that they’re higher maintenance—they collect dust and dirt and can even become a tripping hazard if the excess fabric is too long. Keeping the puddle to about 2-4 inches is ideal for most settings. Anything beyond that can start to look unintentional or even messy, detracting from the overall impact.
Curtain Sizes
One size does not fit all when it comes to curtains, and it’s crucial to go beyond the standard lengths if you want your window treatments to look intentional rather than an afterthought.
Most ready-made curtains come in lengths of 84, 96, and sometimes 108 inches, but these sizes are only the starting point. If your ceilings are higher than average or your rods are installed closer to the ceiling, these standard sizes won’t give you that full, elegant look you’re after. A common mistake is choosing curtains that are too short for the window height, which can make the room feel incomplete.
For those with unique window sizes, custom curtains are an option, though they can come with a hefty price tag. If that’s not in the budget, there are still workarounds. For example, you can buy longer curtains and have them tailored to your exact measurements. Hemming them to the proper length will ensure they don’t float awkwardly above the ground or drag excessively. If you’re installing curtains in a room with lower ceilings, opt for the longer curtain length and hang the rod higher to create an illusion of height. It’s a small trick, but it can make a significant difference in how the room feels.
Shorter curtains, such as those around 72 inches, have their place too, but they work best in specific settings like over window seats, under built-in benches, or in more casual spaces like a cottage or a dormer window. In these cases, the shorter length can be charming and functional, especially when paired with a more relaxed aesthetic.
Curtain Width
It’s essential to choose curtains that are wide enough to cover your windows with plenty of fabric to spare. A good rule of thumb is to aim for curtain panels that are 1.5 to 2.5 times the width of your window. This extra fabric will allow the curtains to drape beautifully, creating those soft, flowing waves when they’re drawn closed. The fuller the curtains, the more luxurious and custom they’ll feel. It’s all about creating volume—something that instantly elevates the look of a room.
If you’re buying ready-made curtains, you might find that two panels won’t provide enough fullness. In this case, don’t hesitate to buy multiple panels. You can place two on each side of the window to achieve the desired effect. When done correctly, the additional panels will blend seamlessly, and the break between them won’t be noticeable because of the fullness of the fabric. Another option is to have the panels sewn together by a tailor to create one larger, continuous piece of fabric. This ensures that your curtains look cohesive and don’t have awkward gaps when closed.
The key is to plan for enough fabric. Don’t skimp, even if cost is a concern. Opting for cheaper fabric done right—where the curtains are wide and full—will look far better than an expensive fabric that’s stretched too thin. If budget is an issue, explore affordable options from places like Ikea or Amazon, where you can find curtains that give you the width you need without breaking the bank.
Hardware
First, let’s talk about rods. The curtain rod you choose should complement both the fabric of the curtains and the overall style of the room. Heavier fabrics, like velvet or thick linens, need more substantial rods to support their weight, while lightweight sheers can get away with thinner, more delicate rods. For a modern or minimalist look, sleek metal rods or even ceiling tracks work well. In more traditional or formal spaces, you might opt for a thicker, more decorative rod made of wood or polished brass.
It’s not just about the material, though—consider the rod’s finish too. Oil-rubbed bronze, brushed nickel, or Lucite rods can tie in beautifully with the rest of the room’s hardware and finishes, whether it’s in your furniture, light fixtures, or other accents. Matching these elements creates a sense of cohesion that helps pull the entire space together.
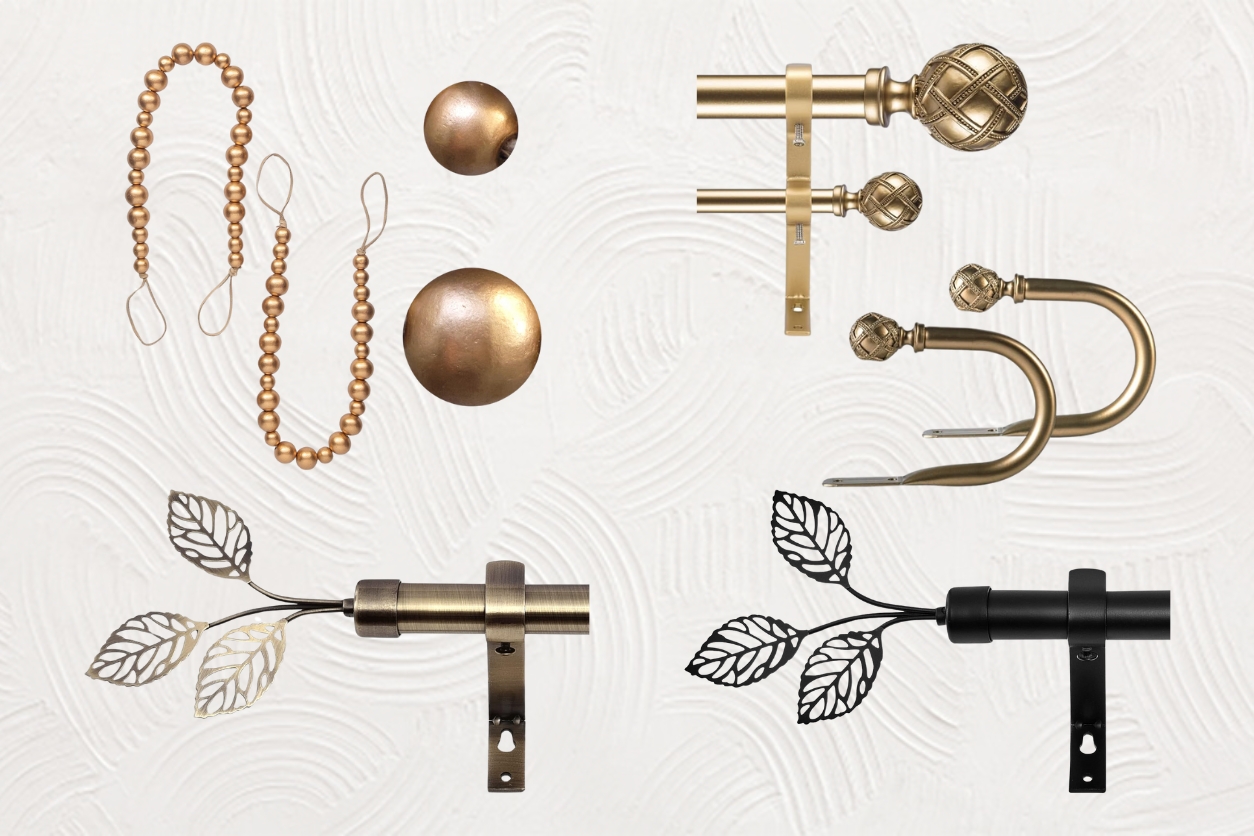
Now, let’s move on to finials, which are the decorative end caps on the rod. Finials are where you can get creative. They come in a range of styles, from simple and understated to bold and ornate. If you’re going for something classic, a rounded or ball finial will do the trick, while more decorative options, like crystal or sculpted designs, can add personality and flair to the room. Finials can be a great way to inject a bit of fun or elegance into an otherwise neutral space. They’re small but can make a big impact on the overall look.
How to Hang Curtains
What You’ll Need:
- Measuring tape
- Drill
- Screws
- A level
- A stud finder
- Rod brackets
- Curtain rod
Step 1: Measure Your Space
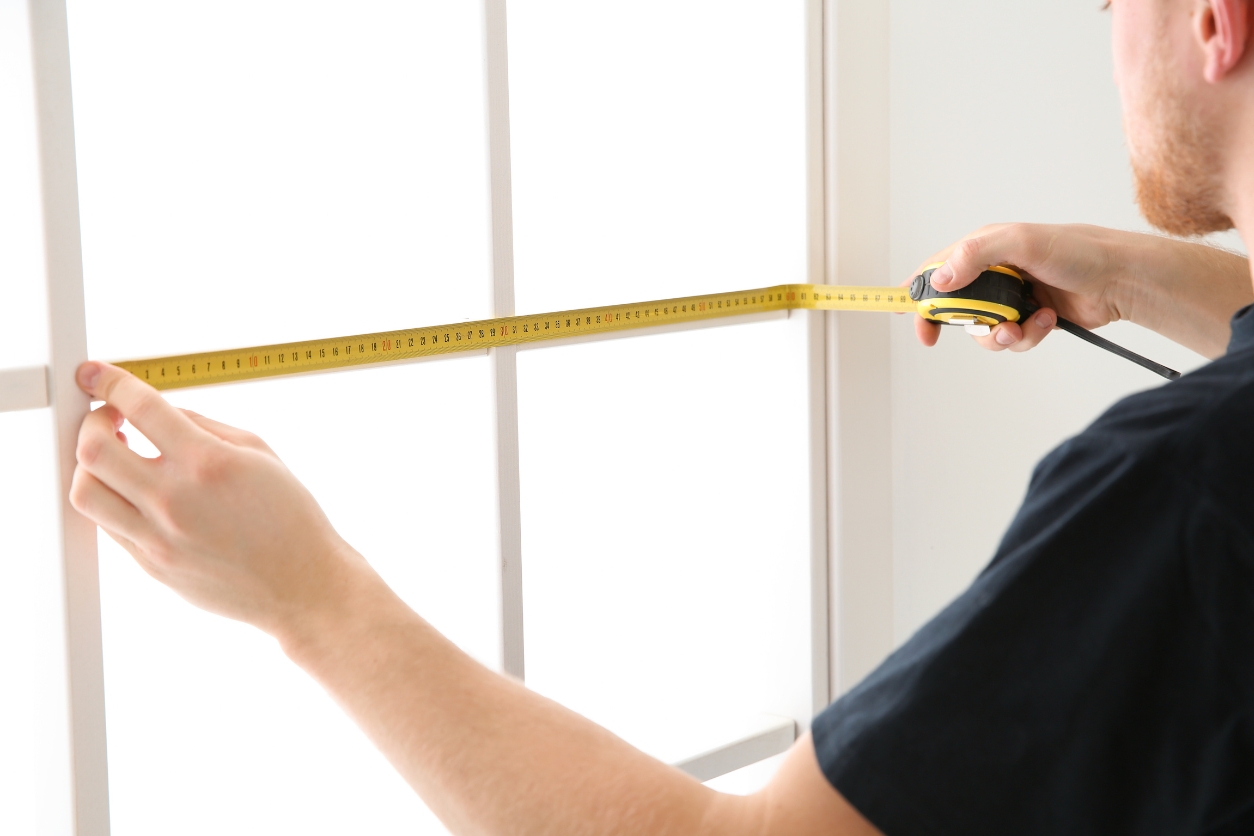
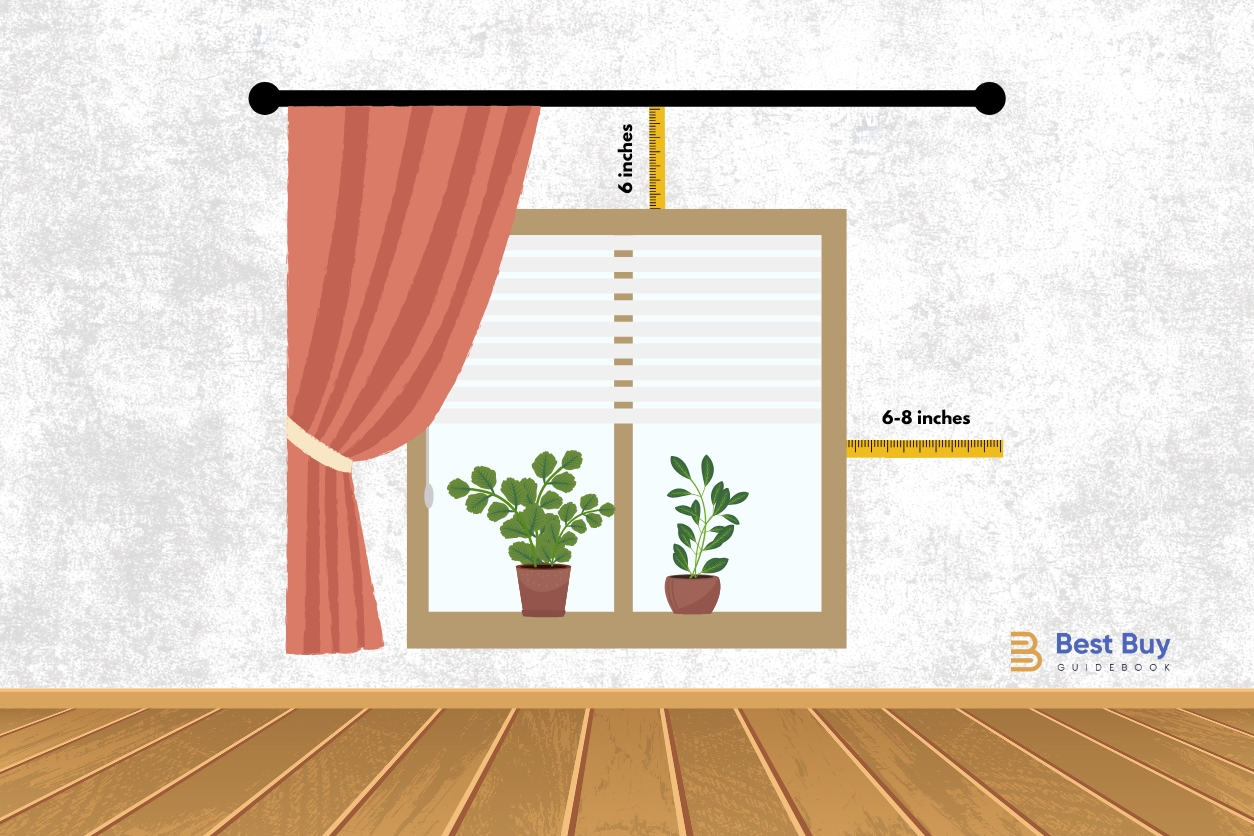
Before anything gets mounted, you need accurate measurements to ensure everything will align perfectly. Measuring the window itself isn’t enough—you also need to account for the placement of your curtain rod, whether you’re opting for a wall or ceiling mount. Ideally, you’ll want to install the rod higher and wider than the actual window to make the room feel more expansive and allow the curtains to frame the window nicely when drawn open. The width of the curtain rod should extend 6 to 10 inches past the window on each side, so your curtains don’t obscure any light when pulled back.
Use a metal tape measure for precision, and don’t rush through this part. Improper measurements are one of the most common mistakes, and they can completely throw off how your curtains hang. Whether you’re working with standard curtain sizes or custom treatments, getting these measurements right is critical. Once you know where the rod will go, mark those points with a pencil, and double-check your work to ensure symmetry on both sides.
Step 2: Gather Your Tools
Having the right tools on hand will save you a lot of frustration. You’ll need a drill, screws, a level (preferably a laser level for accuracy), anchors if you’re not mounting into studs, and, of course, a ladder. If you’re working with heavier curtains, it’s essential to use hardware that can bear the load—this is especially true if you’re mounting into drywall, where drywall anchors are necessary to provide the additional support needed.
A stud finder is a useful tool when you’re installing curtain rods, as it helps locate the wooden or metal studs in the wall, ensuring that your brackets are secured into a solid structure rather than just drywall. If you’re using a ceiling mount, you’ll also want to verify that the area where you’re drilling has enough structural support, especially when hanging heavier curtains or if you’re working with a high ceiling.
Step 3: Install the Rod Brackets
Once your measurements are in place, it’s time to install the rod brackets. If you’re using a wall mount, ensure the brackets are evenly spaced on either side of the window. Use your level to confirm they’re aligned before drilling the holes. If you’re hanging curtains across a wide window, make sure to add a middle bracket for extra support—curtain rods can sag in the middle if they’re too long or carrying heavy fabric, which can lead to a less-than-polished look.
For ceiling-mounted curtains, the process is similar, but placement is key. Ensure that the brackets are evenly spaced along the ceiling and positioned at a height that will allow the curtains to hang at the proper length. Again, a level is crucial here to avoid a crooked curtain rod.
Once your brackets are secured, double-check their stability by lightly pulling on them. You don’t want any wobbling, especially once the full weight of the curtains is added.
Step 4: Attach the Curtains to the Rod
Now that the brackets are securely in place, it’s time to get your curtains onto the rod. Depending on the style of curtain you’re using—whether it’s grommet, pinch pleat, or Ripple fold—you’ll either be sliding the curtain directly onto the rod or attaching it with rings or clips.
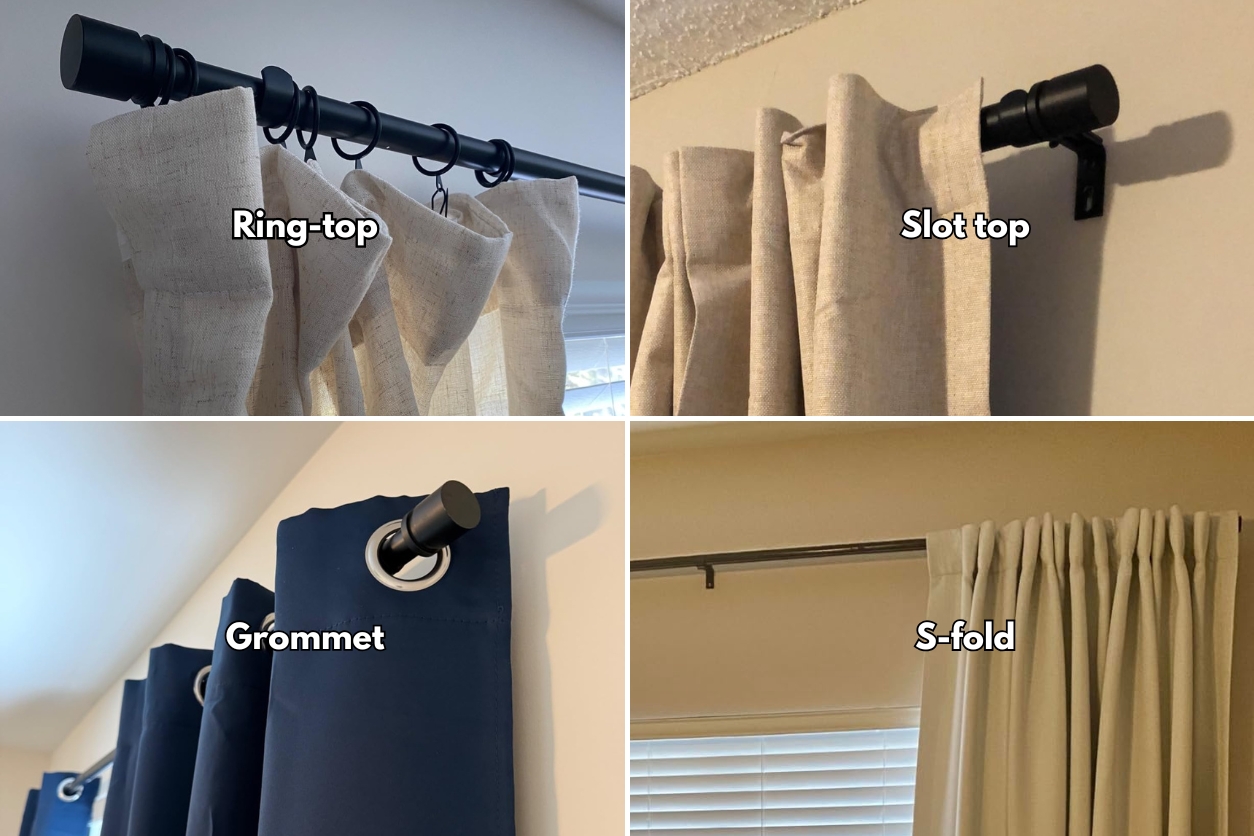
For grommet or ring-top curtains, this part is simple. Just thread the rod through the rings or grommets, making sure the fabric is evenly distributed. If you’re using hooks or clips, like those that come with pinch-pleat or S-fold curtains, attach them before hanging the rod. The key is to ensure that the spacing between the pleats or hooks is consistent for a clean, symmetrical look. This step can take a little time to get right, but it’s worth it to avoid uneven or bunched-up sections.
If you’re working with ripple fold curtains, the attachment process will be a bit different. You’ll need to insert the curtain hooks into the pre-installed track system, ensuring they’re evenly spaced to create those signature soft folds. This type of curtain can give a sleek, modern appearance and slides effortlessly when opening or closing.
Step 5: Hang the Rod
With the curtains now attached, it’s time to place the rod onto the brackets. This part is best done with two people, especially if you’re working with a wide or heavy curtain. One person should hold each end of the rod, lifting it into position and gently setting it onto the brackets. Once the rod is in place, secure it with the screws provided with the rod brackets (some systems also have small screws that lock the rod into place for added stability).
After the rod is set, step back and look at the curtains. Ensure they are hanging at the correct length and draping evenly on both sides. Adjust the fabric if needed, and confirm that the curtains open and close smoothly. If you’re using a system like Ripple fold or another track system, check that it glides easily without catching or sticking.
Finishing Touches
Once your curtains are up, you might need to adjust the hem or fold to get the exact look you’re going for. If you’re aiming for a “kiss” with the floor, make sure the hem is even all the way across. If you’re going for a puddle effect, gently arrange the fabric at the bottom for a casual, luxurious look without making it seem too bunched.
Now’s also the time to add any tiebacks or holdbacks if you’re using them. These accessories can help shape the way the curtains hang when open, giving them a more formal or relaxed appearance. Tiebacks can be installed directly into the wall, and their height can be adjusted to either bring the curtains together at the middle of the window or keep them more open and gathered towards the edges. If you want to open your curtains automatically, you can even install a curtain opener.
FAQs
1. How do I know what size curtain rod to use?
For most windows, you’ll want a rod that extends about 6-10 inches beyond the window frame. This allows you to pull the curtains back fully without blocking the window.
2. Should I use curtain rings or thread the curtain directly onto the rod?
It depends on the look you’re going for. Rings are great for heavier curtains and provide an elegant, smooth glide when opening and closing. Threading directly onto the rod works for a more streamlined, minimal look but can be harder to move.
3. What’s the best way to clean long curtains?
Many fabrics are machine washable, but for heavier, lined, or custom curtains, dry cleaning is often recommended. Always check the care label before washing.
4. How can I make sure my curtains stay evenly spaced when open?
A little hack: use curtain weights at the bottom hem or sew pleat hooks inside the curtain. This helps the fabric drape evenly and creates those nice, full folds.
Decades of Combined Expertise
Best Buy Guidebook is a culmination of online publishing lessons learned. From SEO to paid ads, our team has experienced the highest of highs and the lowest of lows. Our goal now is simple: Arm readers with the most information possible.
