Upgrading your bathroom doesn’t just happen with fancy soaps or plush towels—sometimes, it’s about making practical changes that genuinely improve your daily life. A bidet is more than just a luxury; it reduces your reliance on toilet paper, and add a bit of comfort to what’s typically a mundane part of the day. Learning how to install a bidet yourself might seem like a hassle, but the reality is far less complicated than you’d think. In fact, with a bit of know-how and the right tools, you can have a bidet up and running in no time, cutting down on paper waste, saving money, and, quite honestly, treating yourself to a more refreshing experience.
What You’ll Need
Most bidet attachments come with the necessary parts, but it’s always good to double-check. You’ll typically need:
- A standard or electric screwdriver
- The bidet attachment itself
- A T-valve (usually included with the bidet)
- A flexible hose
- Some basic tools like a wrench
- Teflon tape (for sealing connections)
Prep Your Toilet
Prepare your toilet for the bidet installation by turning off the water supply. You’ll usually find the shutoff valve near the base of the toilet. Once the water is off, flush the toilet to drain the tank, ensuring that you’re working with a dry surface. Disconnect the water supply line from the toilet tank, using a small bucket or towel to catch any residual water.
Next, clean the top of the toilet bowl thoroughly. This is where the bidet attachment or seat will go, so it’s important to have a clean, smooth surface. If you’re installing an electronic bidet seat, you might also need to remove the existing toilet seat. Most seats are held in place with screws, which can be easily removed with an electric screwdriver.
How to Install a Bidet
Standard Bidet
For a standard bidet attachment, begin by attaching the provided T-valve to the water supply line. The T-valve splits the water flow between the toilet and the bidet. Ensure that the rubber gasket is in place to prevent leaks. Attach the T-valve to the bottom of the toilet tank where the water supply line was previously connected. Hand-tighten it first, then give it an extra quarter turn with a wrench to secure it.
Next, connect one end of the flexible hose to the T-valve and the other end to the bidet. Place the attachment over the toilet bowl, aligning it with the bolt holes where the seat was previously attached. Reattach the toilet seat over the bidet attachment, securing it with the bolts. Make sure everything is aligned properly before tightening the bolts completely.
Electronic Bidet
If you’re installing an electronic bidet seat, the process involves a few additional steps but is still manageable. After turning off the water and removing the old toilet seat, you’ll install the mounting plate. Most electronic bidets come with a template to help you align the mounting plate correctly. Place the template on the toilet bowl, then position the mounting plate over it.
Insert the provided rubber grommets into the bolt holes, and lightly screw in the mounting plate. The grommets should be soaked in water for a few minutes before installation to make them more pliable. This will help them fit snugly into the holes. Once the plate is in place, you can adjust its position as needed, then tighten the screws.
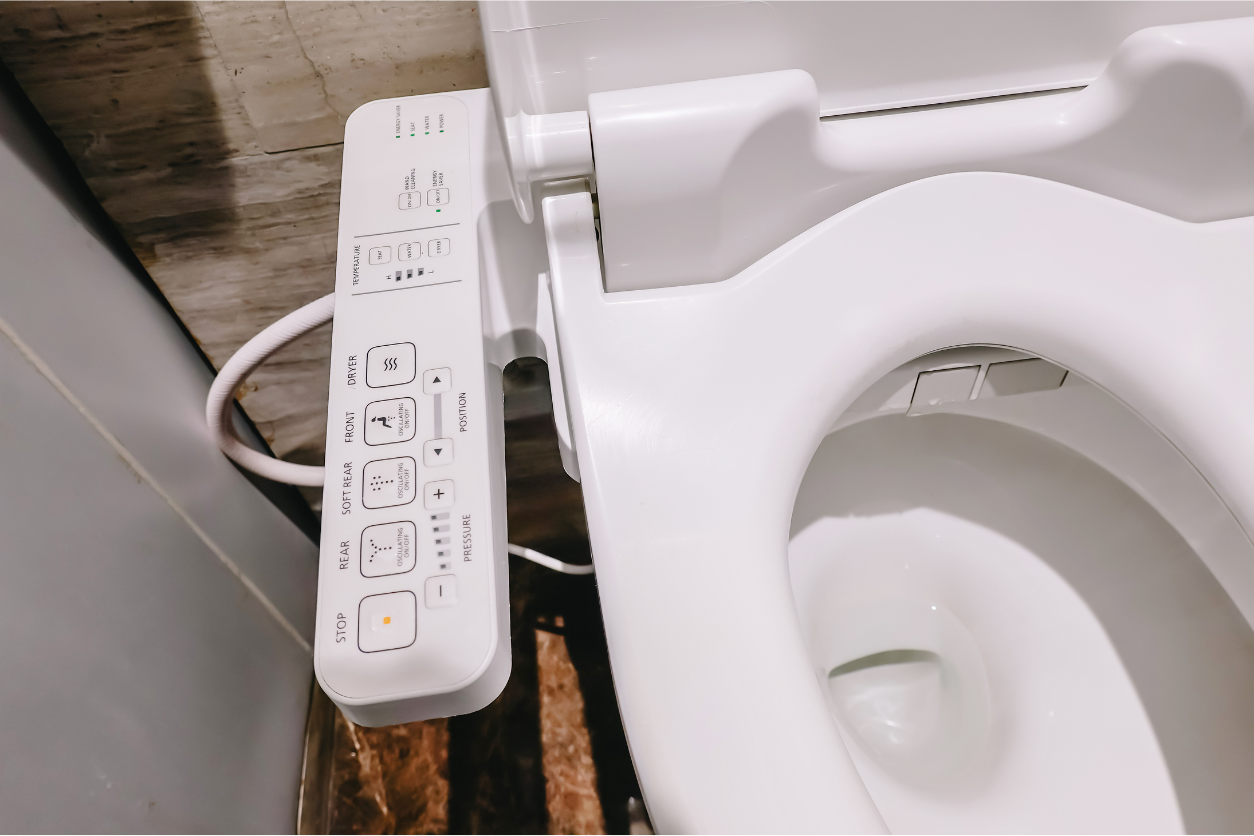
With the mounting plate secure, slide the electronic bidet seat onto the plate until you hear a click. This indicates that the bidet is locked in place. Now, connect the water supply line to the bidet. If your attachment has additional features like a dryer or deodorizer, make sure to plug it into an electrical outlet. Many electronic bidets also come with a remote control, which allows you to test all the functions before using it.
Testing and Final Adjustments
Once your bidet is installed, turn the water supply back on slowly. Check for any leaks around the connections. If you notice any water escaping, you may need to tighten the connections slightly or apply more Teflon tape.
Electronic bidets offer a range of advanced features that can enhance your bathroom experience. These bidets typically include options like adjustable water pressure, temperature control, a dryer, and even a night light. Use the remote control to test all functions. Place your hand over the sensor (which detects when someone is seated) and press the buttons to activate different features like the water spray, dryer, and deodorizer. If everything is working correctly, your bidet is ready to use.
Make sure the power outlet you use is GFCI-protected, as this is important for bathroom safety. The GFCI outlet will shut off the power in case of any electrical fault, preventing potential hazards. Most electronic bidet seats come with detailed instructions on setting up and using the remote control, which allows you to customize your experience according to your preferences.
Common Mistakes to Avoid
When installing a bidet, especially an electronic one, there are a few common mistakes you’ll want to avoid. First, always make sure the water supply is turned off before you begin working. All rubber gaskets and washers should also be in place before tightening connections to prevent any leaks.
Another common issue is over-tightening connections, which can damage threads or fittings, leading to leaks or even breakages. Tighten connections by hand first, then use a wrench to give them an additional quarter turn—no more than that. Finally, if you’re installing an electronic bidet, double-check that the power cord can reach the outlet without stretching or straining, which could cause damage over time.