How to Print From Canva: A Step-by-Step Guide

It’s hard to think of an easier tool than Canva when it comes to creating professional designs without needing a degree in graphic design. Whether you’re running a small business, creating a personal project, or working in a corporate setting, Canva simplifies the entire process. Its intuitive interface and wide variety of templates make it incredibly accessible, even for those who aren’t design-savvy. But what really sets Canva apart is its flexibility. You can use it to create anything from social media posts to detailed presentations, marketing materials, and more, all with a few simple clicks.
Now, once you’ve finished designing, the next step is usually to print. Whether it’s a flyer, a business card, or even a personal calendar, knowing how to print from Canva can save you a ton of time and ensure that your final product looks just as good in person as it does on your screen.
How to Print from Canva
Printing from Canva might seem straightforward, but there are a few details that can make a big difference in the quality of your final product. Canva gives you a couple of options depending on whether you’re printing at home or ordering prints directly from their service. Each method has its own advantages, so knowing how to navigate through them is key.
The first thing to consider is what kind of project you’re working on. Are you printing something simple like a poster or flyer, or do you need something more specific like a folded brochure or business card? Canva can handle both, but the setup for printing is slightly different depending on the complexity of your design. This flexibility is one of the reasons businesses love using Canva—it’s quick, easy, and offers a lot of customization.
Getting the File Type Right
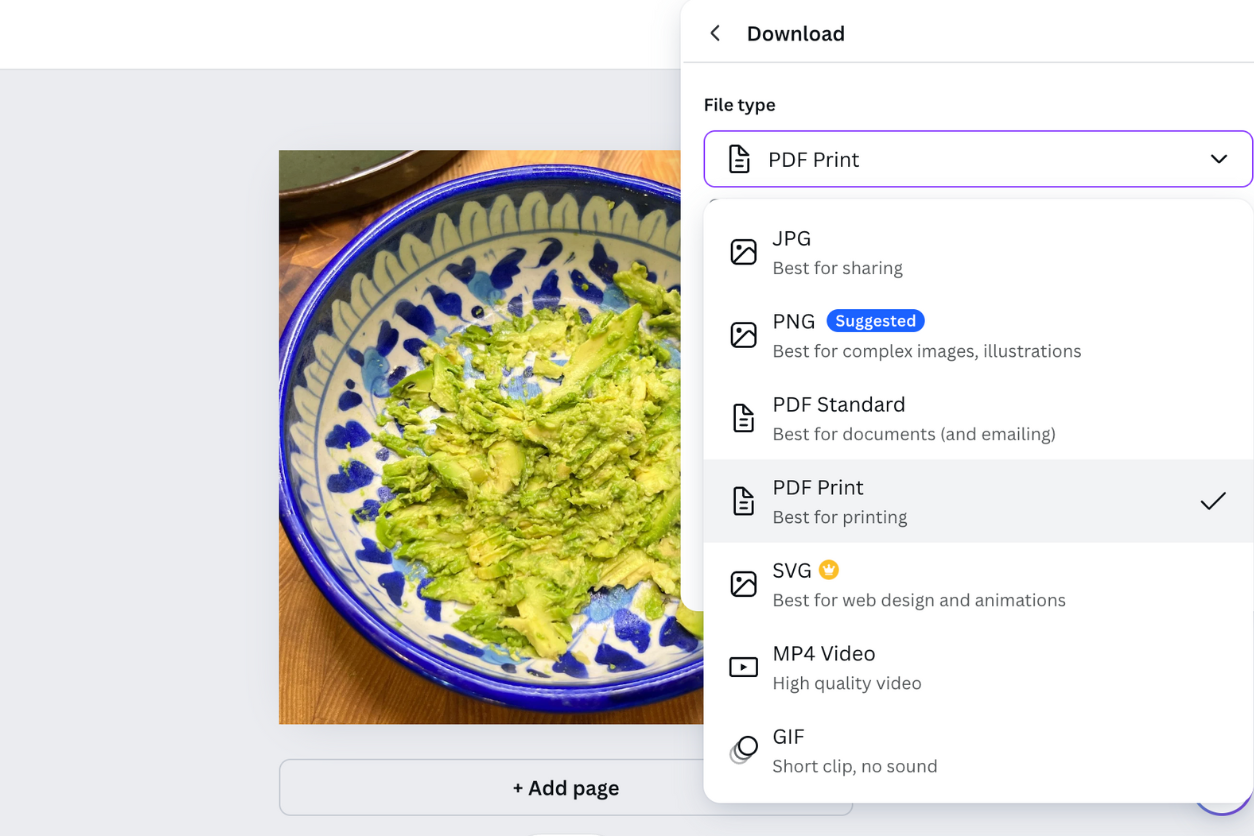
When it comes to how to print from Canva, selecting the right file type is crucial. Canva offers different options depending on how you plan to use your design. For print, you’ll want to use the PDF Print option. This gives you the highest resolution (300 dpi), which is what you need for crisp, clear prints. It also allows you to include crop marks and bleed, two important features if you’re printing professionally.

Why is this important? The print bleed ensures that there’s no unwanted white border around your design when it’s cut, and crop marks guide where the design will be trimmed. These small details are what make the difference between a homemade project and a professional-looking print.
Setting Up Bleed Margins
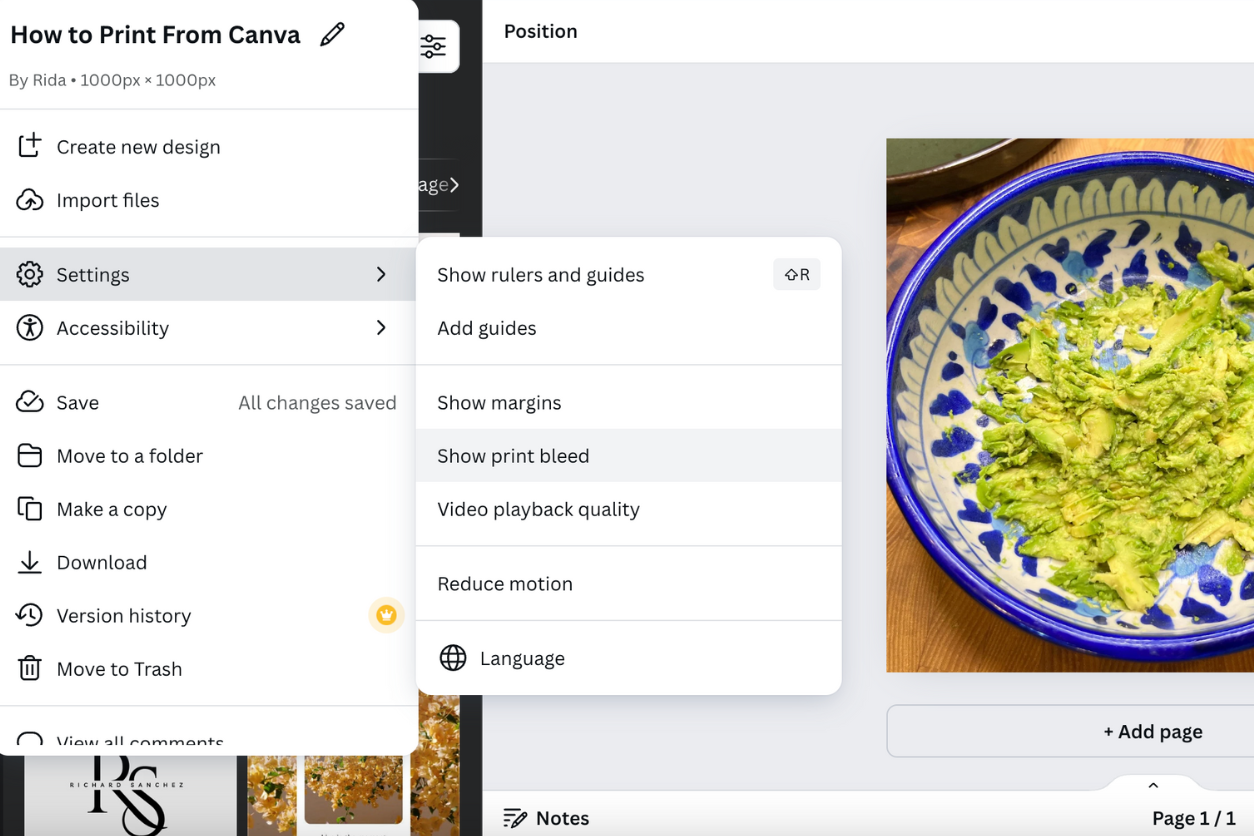
If you’ve ever had a printed design come out with a weird white edge or a cut that’s too close to your text, it’s probably because you didn’t set up a proper print bleed. Canva makes this easy. In the File menu, there’s an option to show the margins and bleed lines for your design. These guides help you place your elements in the right spots, ensuring nothing important gets trimmed off during printing.
Here’s how it works: Once you activate the print bleed option, Canva extends the edges of your background slightly beyond the document’s trim lines. This prevents any awkward gaps when the paper is cut to size. It’s especially useful if your design has a background color or image that runs all the way to the edges.

Now, download your design and open it with your PDF viewer. From there, you should see an option to print. But before you do that, make sure your printer is connected to Wi-Fi (if it’s wireless) and your computer or the device you’re printing from.
How to Print from Canva Directly
One of the great things about Canva is that you can handle everything, from design to print, without leaving the platform. Canva offers a direct printing service where you can order prints and have them shipped to your doorstep. This is ideal if you’re printing in bulk or need a higher quality print than your home printer can provide.
Here’s what you need to do: Once your design is ready, click on the three dots in the top right corner of the Canva editor. From there, choose the “Print” option. You’ll then be prompted to select your print format (posters, business cards, etc.). Canva will automatically check your design for any issues that might affect printing, such as low-resolution images or elements too close to the edge.
After selecting your format, Canva gives you a preview with crop marks and bleed lines so you can see exactly how the final product will look. From there, you can choose the size, paper type, and quantity before placing your order. It’s a seamless process, and Canva’s print quality is surprisingly good for the price, making it a popular choice for small businesses and personal projects alike.
Troubleshooting Common Issues
Even with Canva’s simplicity, there are a few hiccups you might run into when printing, especially if you’re doing it at home. The most common issue? Misaligned prints or unwanted borders. This usually happens if your printer settings don’t match the file you’ve downloaded. Be sure to select the “Actual Size” or “100% scale” option when printing from a PDF to avoid shrinking or stretching the design.
Another common problem is color accuracy. What looks vibrant on your screen might not translate perfectly to paper, depending on your printer and ink quality. If color precision is crucial, you might want to test a few prints or adjust your design accordingly. Canva does offer color profile settings that can help mitigate some of these issues, especially for professional print jobs.
Decades of Combined Expertise
Best Buy Guidebook is a culmination of online publishing lessons learned. From SEO to paid ads, our team has experienced the highest of highs and the lowest of lows. Our goal now is simple: Arm readers with the most information possible.
