This Is Exactly What You Should Know About When to Start Seeds Indoors
Starting seeds indoors is one of the most exciting parts of gardening, but getting the timing just right can definitely be tricky! It’s easy to get excited and plant everything too early, only to watch your seedlings outgrow their pots before the weather even warms up. On the flip side, not knowing when to start seeds indoors can leave you scrambling to catch up, with little time for your plants to mature.
In this guide, we’ll explore everything you need to know—from perfecting the indoor environment to knowing when it’s safe to transplant your seedlings into the garden.
When to Start Seeds Indoors
The answer to this question mainly depends on the plant and your local climate. Most gardeners will aim to start seeds indoors about 6 to 8 weeks before the last expected frost in their area. This gives the plants enough time to grow strong, without being too far ahead of the outdoor growing season.
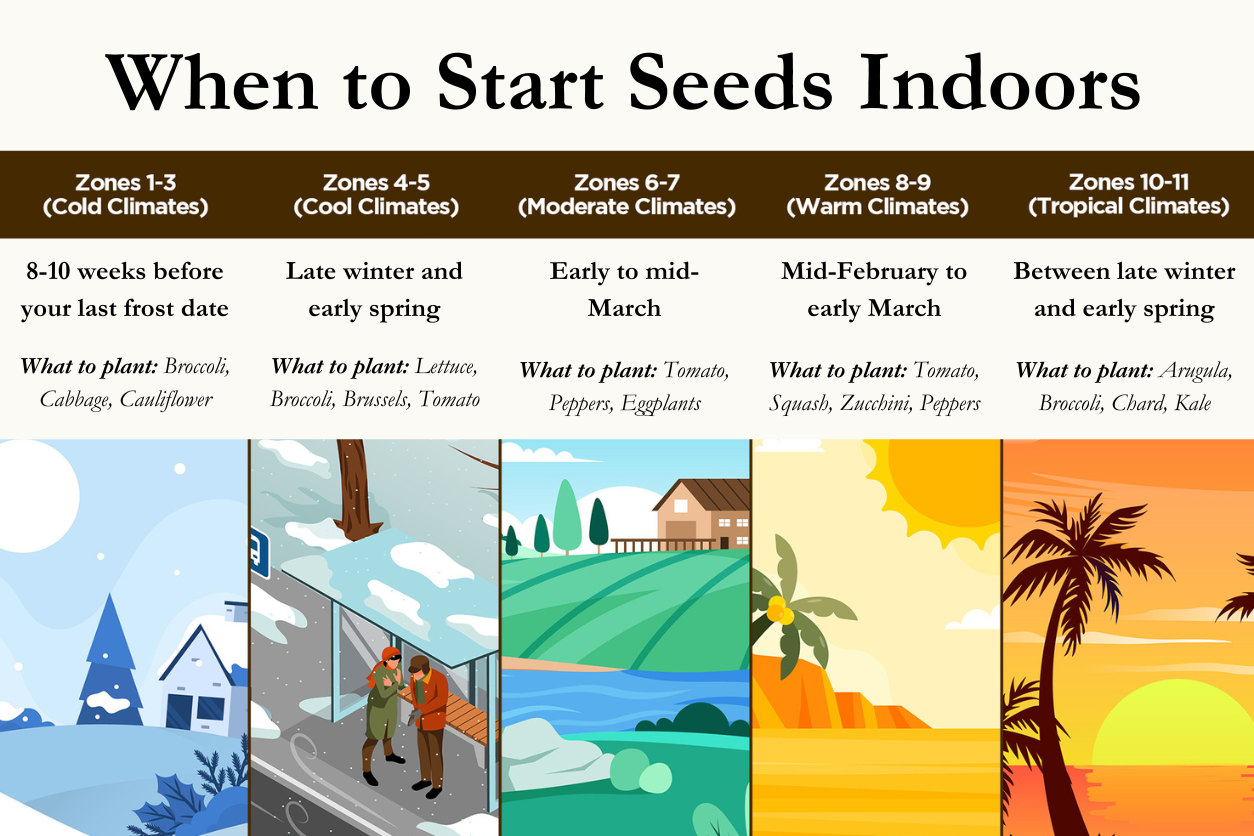
Climate zones or USDA hardiness zones also play a key role in determining the right time to start seeds indoors. Here’s how it works:
Zones 1-3 (Cold Climates)
In these chilly zones, we recommend planning on a longer waiting game. The growing season’s short, so you’ve got to start your seeds indoors early enough to give your warm-season crops the time they need to mature. You’ll want to start seeds 10 to 12 weeks before the last expected frost.
For example, if your last frost usually happens around late May, get your seeds going by late February or early March. It might feel like you’re jumping the gun, but trust me, those extra weeks inside make all the difference. Once it’s warm enough outside, your plants will be ready to thrive, not just survive.
Zones 4-5 (Cool Climates)
These zones give you more leeway to start a little later, but trust us; you still want to start earlier. So, if that final frost usually hits around mid-May, then late March or early April is your time to start. This allows your cool-season plants to thrive, and it’ll give those warm-season crops enough time to get their roots settled before they face the heat.
Zones 6-7 (Moderate Climates)
Moderate climates are the best for seeding with their longer growing seasons. You’ll be looking at a window of 4 to 6 weeks before the last frost for most of your warm-season crops, like peppers and eggplants. So, if the last frost is around mid-April, go ahead and start your seeds in early March. That extra head start will help you get a good crop without worrying about frost nipping at your seedlings. Don’t forget, a little planning still goes a long way.
Zones 8-9 (Warm Climates)
These zones stretch the growing season even longer, so you don’t have to rush to start seeds indoors. For example, if your last frost is in early April, starting your seeds in mid-February will set you up for a solid season. You won’t have to stress about frost damaging your plants.
Zones 10-11 (Tropical Climates)
If you’re in a tropical zone, things change a bit. With mild winters and early warm temperatures, you won’t have to start your seeds months in advance. But that doesn’t mean you should completely skip it. For crops like tomatoes and peppers, start your seeds indoors 2 to 4 weeks before you plan to transplant. The longer growing season means you can often sow directly in the ground, but getting those seeds going indoors just gives you a stronger shot at strong, healthy plants. If you’re transplanting in March, think about getting those seeds going in late January or February.
How to Create the Right Indoor Environment for Your Plants
Once you’ve got your timing down, creating the right environment for your seedlings is the next big step. Your indoor garden should function like a controlled environment where you’re mimicking the conditions outside—without the unpredictable weather.
First, light is essential. Most seedlings need about 12 to 16 hours of light each day. If you’re lucky enough to have bright windowsills, you can use that natural light, but most indoor gardeners will opt for grow lights to give their plants the best chance. LED or fluorescent grow lights are ideal and can be adjusted as your plants grow taller.
Temperature is another key factor. While most seeds sprout best in a warm spot, the temperature shouldn’t fluctuate too much. A consistent range between 65°F and 75°F is usually ideal for most seedlings. Make sure to avoid cold spots or areas with drafts. For some added support, consider using a heat mat under your seed trays to maintain a steady, warm temperature, especially if your indoor space tends to get chilly.
Finally, there’s humidity. Seeds need moisture, but not too much. Keeping the soil moist (but not soggy) is important for good germination. Using humidity domes or plastic covers over your seed trays can help maintain moisture, but remember to remove them once the seeds sprout. Too much moisture can lead to mold, so it’s all about finding that sweet spot.
How to Care for Your Seedlings
Once your seeds have sprouted, they need careful attention to grow into strong, healthy plants. First and foremost, be mindful of watering. Young seedlings are delicate, so it’s important to keep the soil consistently moist (again, not drenched). Using a gentle watering can or spray bottle can help avoid disturbing the young roots. Be sure the trays have proper drainage so that water doesn’t pool at the bottom and create the risk of root rot.
As the seedlings grow, you’ll need to begin feeding them. Once they have a set of true leaves, start using a balanced, water-soluble fertilizer to give them the nutrients they need. A light, diluted solution is perfect for this—too much fertilizer can stress young plants, so err on the side of caution.
Thinning your seedlings is also important. If you’ve planted several seeds in one tray, make sure to remove the weaker ones to give the strongest plants room to grow. This ensures your seedlings don’t compete for light, water, and nutrients, resulting in healthier, more robust plants.
Hardening off your seedlings is an equally important step before transplanting them outside. Gradually introduce them to outdoor conditions by placing them in a shaded spot for a few hours each day. Over the course of 5 to 7 days, slowly increase their exposure to sunlight to reduce transplant shock. This process helps them acclimate to the harsher outdoor elements and ensures they’re ready for the next step in their growth.
Decades of Combined Expertise
Best Buy Guidebook is a culmination of online publishing lessons learned. From SEO to paid ads, our team has experienced the highest of highs and the lowest of lows. Our goal now is simple: Arm readers with the most information possible.